How to Create Viral AI Videos with Google Flow Using One Prompt
AI videos are becoming one of the most popular content creation types on Instagram. From creative product advertisements to cinematic visuals, creators are making content using AI video tools to make eye-catching content without the need for traditional filming and editing. One of the simple workflows is using Google Flow to create an AI video from a prompt.
If you have seen viral AI videos and wondered how they are made, this guide tells you about a simple Google Flow AI video process that you can try.
What Is the Google Flow AI Video Trend?
The newest AI video trend focuses on using Google Flow to make visually appealing videos using a simple text prompt. Rather than record a complete Advertisement manually, you can describe the scene, product, movement and visual style and let the AI generate the video.
This makes Google Flow useful for creators who want to try out AI-generated video, product advertisements and Instagram Reels.
How to Create an AI Video in Google Flow
The process is simple and can be done in a few simple steps.
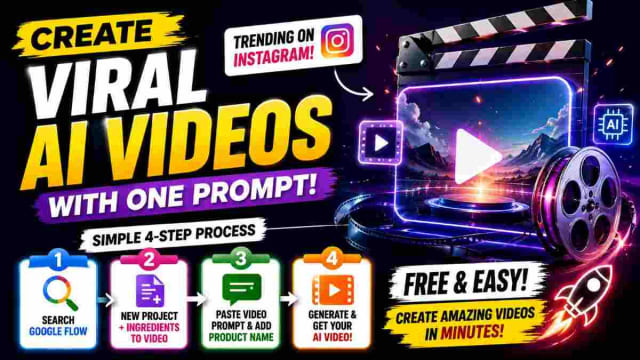
Step 1: Open Google Flow
First, open Google and search for Google Flow. Open the official Flow website and create a new project.
After creating your project, look for the option that allows you to generate a video using ingredients or visual references.
Step 2: Select Ingredients to Video
Use the Ingredients to Video option.
This workflow can be used to provide a set of visual elements and instructions for the video you would like to generate. It is especially useful when your concept revolves around a particular product, visual concept.
Step 3: Add Your Video Prompt
The next step is to paste in your own AI video prompt.
This can describe the product, environment, camera movement, lighting, animation and advertising style that you would like to include in the video. The more precisely you describe the desired scene, easier it will be to communicate your creative idea to the video-generating system.
Step 4: Add Your Product Name
If you are creating a product video, change the placeholder in the prompt with the name of the product that you want to feature.
For example, you could make a creative advertisement for a smartphone, watch, shoe, food product or other article. After adding the product name and submitting the prompt, Google Flow can generate the video.
Why Use Google Flow for AI Videos?
The greatest advantage of this workflow is its simplicity. Rather than manually shoot and edit each scene, creators can start from an idea and describe the desired result using a prompt.
This can be useful for:
- Instagram Reels
- Product advertisements
- Social media content
- AI video experiments
- Creative marketing campaigns
- Short promotional videos
You can also experiment with different prompts to generate multiple versions of the same concept.
How to Get Better Results
For better Google Flow AI video results, make the prompts specific. Describe the product, environment, camera movement, lighting and visual style in detail.
Try to avoid including too many unrelated actions in one short video. A simple sequence with a clear beginning, product focus and final hero shot can make the concept more clear and understandable.
You can also try out different creative styles and prompts to find out a version that you can use for your content.
PROMPT
✨ AI PromptVIDEO GENERATION PROMPT: Create a highly detailed, photorealistic miniature ASMR stop-motion unboxing and installation video featuring the exact [PRODUCT_NAME]. REFERENCE IMAGE ACCURACY If a reference image is provided, treat it as the PRIMARY VISUAL SOURCE for the product. Recreate the miniature product to closely match the reference image, including its exact shape, proportions, colors, materials, surface finish, buttons, screen, vents, handles, branding placement, accessories, and other visible design details. Do NOT redesign, simplify, substitute, or randomly change the product. Maintain the same product identity, color, proportions, and design throughout every shot. If no reference image is provided, generate a realistic miniature version of [PRODUCT NAME]. MINIATURE SCALE & ENVIRONMENT Place the product inside a beautifully crafted cozy miniature dollhouse room. Everything must clearly appear miniature: tiny furniture, miniature wall textures, small decorations, tiny electrical outlets, miniature tools, and realistically scaled accessories. The product should look like a premium, fully functional 1:12 scale miniature replica, not a normal-sized product placed in a small room. Use real human hands entering the miniature environment to emphasize the tiny scale. Hands must remain anatomically correct with five natural fingers and realistic skin texture. VIDEO SEQUENCE SHOT 1 — MINIATURE PACKAGE UNBOXING Begin with an extreme macro shot of a tiny realistic retail packaging box for [PRODUCT NAME] resting on a miniature wooden table. Human fingers carefully hold the tiny box, open the packaging flaps, and slowly slide the miniature product out. The packaging should feel physically believable, with miniature cardboard texture, printed graphics, molded inserts, tiny accessories, instruction booklet, cables, and protective materials where appropriate. SHOT 2 — PROTECTIVE FILM ASMR Show an extreme close-up of fingers gently finding the edge of a transparent protective film attached to the product. Slowly peel the film away in one continuous satisfying motion. Show realistic plastic stretching, reflections, tiny wrinkles, adhesive separation, and subtle material movement. Emphasize satisfying peeling, crinkling, tapping, clicking, and packaging ASMR sounds. SHOT 3 — MINIATURE ASSEMBLY Place the product components neatly on the miniature table. Hands physically assemble the [PRODUCT NAME] step-by-step using appropriately tiny components and miniature tools where necessary. Every component must visibly connect through realistic physical interaction. Parts must NOT magically appear, teleport, transform, or assemble themselves. Include satisfying macro shots of tiny screws tightening, pieces snapping into position, connectors being inserted, and components aligning perfectly. SHOT 4 — INSTALLATION Carefully carry the completed miniature [PRODUCT NAME] into its correct position inside the dollhouse room. Hands physically place, mount, attach, or position it exactly as the real full-size product would normally be installed. Maintain realistic scale, gravity, contact, shadows, and object interaction. SHOT 5 — POWER CONNECTION Show a macro close-up of a tiny realistic power cable being picked up and physically inserted into the miniature [PRODUCT NAME]. Then show the miniature plug being inserted into a tiny wall outlet. The cable must remain continuously visible and physically connected. No disappearing wires or impossible connections. SHOT 6 — TURNING IT ON A fingertip gently presses the miniature power button. Show realistic activation behavior appropriate for [PRODUCT NAME]: tiny indicator lights illuminate, displays activate, mechanical components begin moving, or other real product functions start operating. Include a satisfying tactile click, subtle electrical startup sound, and realistic operational ASMR. SHOT 7 — FINAL BEAUTY REVEAL Finish with a slow cinematic macro reveal of the fully assembled and functioning miniature [PRODUCT NAME] inside the cozy dollhouse environment. Show multiple close-up angles highlighting its tiny construction, realistic materials, working details, reflections, buttons, cables, and craftsmanship. End with a smooth miniature hero shot where the entire product is clearly visible and recognizable. VISUAL STYLE Ultra-photorealistic miniature craftsmanship, premium stop-motion aesthetic, extreme macro photography, shallow depth of field, realistic focus breathing, subtle stop-motion hand movement, warm cinematic practical lighting, physically accurate shadows, realistic reflections, micro scratches, fingerprints, cardboard fibers, plastic textures, metal details, tiny screws and believable material imperfections. Make the miniature scale immediately obvious through the contrast between full-size human fingertips and the tiny product. ASMR AUDIO Prioritize clean environmental ASMR with no narration, no dialogue, and no music. Capture satisfying miniature sounds: cardboard opening, plastic crinkling, protective-film peeling, tiny parts tapping on wood, miniature screws turning, components clicking together, cable insertion, power-button click, and subtle operating sounds from the product. STRICT CONSISTENCY RULES The same exact [PRODUCT NAME] must appear throughout the entire video. Never change its design, color, dimensions, branding, buttons, accessories, or materials between shots. All actions must be physically performed by the hands on camera. No teleportation, morphing, instant assembly, floating objects, disappearing components, duplicate products, impossible physics, or sudden scene changes. Keep the same miniature room, lighting direction, product scale, visual style, and overall environment throughout the sequence. The final result should feel like someone genuinely purchased, unboxed, assembled, installed, plugged in, and tested an extremely detailed functional miniature version of the real product.
Conclusion
Creating viral-style AI videos with Google Flow can be a simple process. Start a new project, select Ingredients to Video, paste your own video prompt, replace the product name and generate your video.
This workflow can be especially useful for creators and businesses looking for alternative ways to make content in the form of AI product advertisements and Instagram Reel material. With a good prompt and clear creative idea, you can experiment with different video concepts and turn simple product ideas into interesting content.
dinxsh7
EditorEditorial contributor researching practical guides, tech discoveries, and curated recommendations for Dinesh Picks.
Continue Reading