Create AI Videos with Google Flow Using Your Photo | Easy Guide
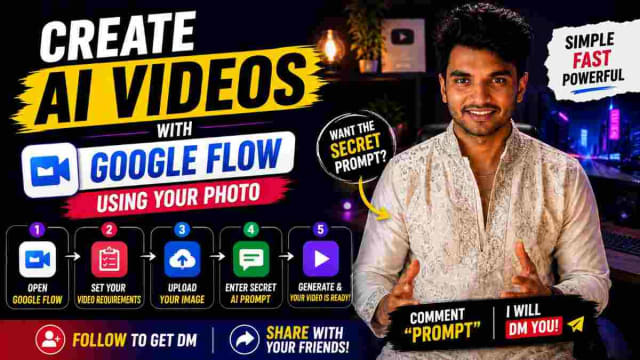
How to Make AI Videos with Google Flow Using Your Photo
SCROLL DOWN FOR FULL PROMPT
Making AI videos with Google Flow has become an accessible way for turning a photo into an engaging cinematic video. If you've seen creative AI videos on Instagram and wanted to recreate a similar concept you can use your own image and a well-crafted AI video prompt.
The process is straightforward and does not require advanced video editing skills. You need a suitable image, your desired video requirements, and a detailed prompt.
What Is Google Flow AI Video?
Google Flow is an AI-based creative tool that allows users to generate and work with video content through the use of prompts and visual references. By describing what you want and providing a visual reference you can guide the generation towards a particular scene and style.
This makes it particularly useful for creators that want to experiment with AI video generation, photo-to-video content, cinematic videos, and Instagram Reels.
How to Create an AI Video Using Your Image
The first step to this process is to open up Google Flow and select the video creation option that is available.
Before we generate the video decide what type of content you want to create. You can plan your video style, aspect ratio, video length, environment, camera framing, character actions, and overall visual appearance.
When making Instagram Reels it's practical to go for a vertical 9:16 format.
Step 1: Set Your Video Requirements
Before entering the prompt decide your video requirements. For example, you can ask to make a video in a vertical format with a realistic visual style, cinematic lighting, a particular environment, natural movements, and a specific camera angle.
Having clear requirements can help the AI understand what you want the final result to be instead of leaving important creative decisions unspecified.
Step 2: Upload Your Image
Next, you can upload the image you want to use as your visual reference.
A clear, high-quality image with the subject clearly visible is generally better for this type of workflow. Your image will serve as the starting point of your visual reference while the prompt will explain what should happen in the generated video.
You can play around with different photographs and creative concepts to generate different results for the AI videos.
Step 3: Enter the AI Video Prompt
The prompt is one of the most important aspects of this process.
Instead of just simply entering a brief instruction such as "make a cinematic video" enter a detailed prompt that explains the video that you want.
Your prompt can detail the subject, environment, lighting, camera position, movements, expressions and visual style of the video you want.
For example, you could describe a person standing in a cinematic location looking towards the camera making natural gestures and speaking naturally. You can also specify a realistic lighting, natural skin texture and smooth movement.
A detailed prompt will give the AI clear creative direction.
Create Natural-Looking AI Videos
When making talking-head videos natural speech and movement is essential. Your prompt can ask for fluent dialogue, realistic mouth movement, natural blinking and subtle hand gestures.
If you have too long of a dialogue the speech may feel rushed or may not fit well within the selected length of the video. Keeping your script concise can help you to make a smoother presentation.
You can also specifically request continuous conversational delivery to minimize unnecessary pauses between phrases.
Create Multiple Clips for One Reel
Instead of making a single long video, creators can also split a concept into multiple shorter clips.
For example, for a 30-second Reel you can split it into three 10-second video clips:
Video 1 – Hook: Introduce the AI video concept and gain attention
Video 2 – Process: Explain the Google Flow workflow (setting requirements, uploading an image, and entering the prompt)
Video 3 – CTA: Ask your viewers to comment for the prompt and follow the page for more AI content
This makes it much easier for you to create a short-form video based on your concept.
Tips for Better Google Flow AI Videos
Use a clear reference image and give specific instructions instead of using vague descriptions. Keep your visual requirements consistent when making multiple video clips for the same Reel.
For talking-head content, keep the same general appearance of a presenter, the studio environment, and the camera framing as consistent as possible across your clips.
It's also important to keep your dialogue short and conversational. Avoid unnecessarily long sentences because it can make your speech feel rushed.
Once you've generated a video you need to review it. Look at the appearance of the facial appearance, mouth movement, hands, background, clothing, and overall motion. If the video does not match your expectations, refine the prompt and generate a new version.
PROMPT
✨ AI Prompt--- ECO-FRIENDLY GANESH CHATURTHI BACKDROP — 20-SECOND CONTINUOUS VIDEO - GLOBAL REFERENCE RULE — HIGHEST PRIORITY **@Image1 = MALE / PERSON REFERENCE IMAGE** Use **@Image1 as the exact reference for the person throughout the entire video.** The person must remain the **same exact person from @Image1**. Preserve the reference image naturally: * Exact facial identity * Face shape * Eyes * Eyebrows * Nose * Lips * Jawline * Skin tone * Facial proportions * Natural facial asymmetry * Natural skin texture * Hair * Hairstyle * Body proportions * Clothing/outfit * Outfit colors * Outfit pattern * Visible accessories **Do not randomly change or redesign any part of the person's appearance.** --- - EXTREME FACE IDENTITY LOCK The person's face is the **HIGHEST PRIORITY**. The face must remain **clear, natural, photorealistic and exactly recognizable as the person in @Image1** throughout all 20 seconds. The face must look like the **real person from the reference image being filmed with a real cinematic camera**. Maintain the exact identity during: * Walking * Bending * Decorating * Reaching * Arranging flowers * Hanging garlands * Placing decorations * Placing the Ganesha idol * Lighting diyas * Turning toward camera * Smiling * Namaste gesture --- ABSOLUTELY NO FACE CHANGES No face morphing. No face swap. No identity drift. No different person. No facial redesign. No beautification that changes identity. No different eyes. No different nose. No different lips. No different jawline. No age change. No skin-tone change. No artificial facial features. No plastic skin. No over-smoothed skin. No AI-looking face. No facial flickering. **Natural facial expressions are allowed, but the underlying identity must remain exactly the same as @Image1.** **FACE CONSISTENCY HAS HIGHER PRIORITY THAN TIME-LAPSE SPEED OR CAMERA EFFECTS.** --- - VIDEO 1 — [0:00–0:10] --BACKDROP SETUP + ARCH DECORATION **OUTPUT: 9:16 VERTICAL — STRICTLY 9:16** **DURATION: EXACTLY 10 SECONDS** **30 FPS — FAST-MOTION DIY TIME-LAPSE** --- [0:00–0:02] — STARTING SCENE Begin with the same person from **@Image1** standing in front of a clean white wall. Banana plants are positioned naturally around the area. The space initially looks simple and undecorated. The person begins preparing the eco-friendly Ganesh Chaturthi backdrop. Show realistic physical interaction with the wall, plants and decoration materials. --- [0:02–0:05] — CIRCULAR ARCH The person progressively builds and decorates a beautiful circular arch. They attach natural banana leaves around the arch. Then add colorful flowers and fresh jasmine garlands. Everything is placed manually and physically. The decorations should not appear magically. Use fast-motion time-lapse for efficient movement while maintaining realistic hand and body motion. --- [0:05–0:08] — BRASS BELLS + FAIRY LIGHTS The person continues decorating the circular arch. They carefully add traditional brass bells. Then they arrange warm glowing fairy lights around the arch. The fairy-light wires remain physically connected. Brass bells hang naturally. Flowers and jasmine garlands move naturally. The person makes small adjustments to ensure the decoration looks balanced. --- [0:08–0:10] — ALTAR PREPARATION The person moves toward the center beneath the completed circular arch. They begin preparing the central floral altar. Flowers are arranged progressively in the center. The person prepares the space where the clay Lord Ganesha idol will be placed. Camera gradually moves from a wider vertical composition toward a medium shot. --- VIDEO 1 — END FRAME At exactly **0:10**, the person is standing at the central altar with the floral arrangement prepared, ready to place the Ganesha idol. Keep: * Same person * Same face * Same clothing * Same hairstyle * Same environment * Same lighting * Same decorations **VIDEO 2 MUST START FROM THIS EXACT MOMENT.** --- - VIDEO 2 — [0:10–0:20] -- GANESHA IDOL + DIYAS + FINAL NAMASTE **OUTPUT: 9:16 VERTICAL — STRICTLY 9:16** **DURATION: EXACTLY 10 SECONDS** **30 FPS — FAST-MOTION DIY TIME-LAPSE** -- CONTINUITY LOCK Start **directly from the final frame of Video 1**. The second video must feel like the **same uninterrupted time-lapse recording**. No scene reset. No new person. No face change. No outfit change. No hairstyle change. No decoration reset. No lighting change. No environment change. --- --- [0:10–0:13] — PLACE GANESHA IDOL Continue directly from the altar preparation. The person carefully lifts and places a **traditional eco-friendly clay Lord Ganesha idol** in the center of the floral altar. The idol must look like a real handcrafted clay idol. Natural clay texture. Traditional Indian festive appearance. Realistic proportions. The person carefully adjusts the idol so it sits properly in the center. --- [0:13–0:15.5] — FINAL FLOWER DETAILS The person continues decorating around the Ganesha idol. They add and adjust flowers around the central altar. They make small final adjustments to the jasmine garlands and banana leaves. The completed circular arch remains clearly visible behind the idol. Fairy lights glow softly. Brass bells hang naturally. --- [0:15.5–0:17.5] — LIGHT BRASS DIYAS The person places traditional brass diya lamps around the altar. They carefully light the diyas one by one. The flames ignite naturally. Warm diya light reflects subtly on the brass and nearby decorations. Realistic flame movement. No artificial glowing effects. --- [0:17.5–0:19] — FINAL DECORATION REVEAL The person steps backward slightly and looks at the completed Ganesh Chaturthi setup. Camera smoothly pulls back to reveal the complete decoration: White wall Banana plants Circular arch Banana leaves Flowers Jasmine garlands Brass bells Warm fairy lights Central floral altar Eco-friendly clay Lord Ganesha idol Brass diyas Everything looks handmade, elegant and festive. --- [0:19–0:20] — SMILE + NAMASTE The person turns naturally toward the camera. Camera moves slightly closer so the face is clearly visible. The person gives a **warm, natural smile**. Then brings both hands together in a respectful **Namaste gesture**. The final face must be **exactly the same face from @Image1**. Natural eyes. Natural skin texture. Natural smile. Natural expression. No exaggerated acting. End on this peaceful festive moment. --- -- TIME-LAPSE & CAMERA FLOW The decoration process should have a **fast-motion DIY time-lapse feel**. However, the person's face must remain stable and realistic. Use: * Smooth camera movement * Natural motion blur on fast actions * Clear face whenever visible * Realistic hand movement * Realistic object placement * Cinematic framing * Natural depth of field The final smile and Namaste moment should slow down naturally enough for the face to be **clear and recognizable**. --- - LIGHTING & ATMOSPHERE Begin with soft natural daylight. As the decoration progresses, warm fairy lights gradually illuminate the backdrop. After the diyas are lit, introduce a subtle warm festive glow. Maintain natural skin tones. Soft highlights. Realistic shadows. Natural reflections. Elegant Indian festive atmosphere. No excessive orange tint. No oversaturation. No artificial glow around the face. --- - REALISTIC PHYSICS Every decoration must be physically placed. Realistic: * Hand movement * Finger movement * Banana leaves * Flowers * Jasmine garlands * Brass bells * Fairy-light wires * Clay idol * Diya flames * Clothing movement * Hair movement No floating objects. No disappearing objects. No duplicated flowers. No magical decoration generation. No object morphing. --- - ABSOLUTE NEGATIVE PROMPT No face change. No face morphing. No face swap. No identity drift. No different person. No actor replacement. No facial redesign. No beautification. No artificial face. No plastic skin. No over-smoothed skin. No AI-looking face. No different eyes. No different nose. No different lips. No different jawline. No age change. No skin-tone change. No facial distortion. No facial flickering. No face inconsistency between frames. No hairstyle change. No outfit change. No random clothing. No random accessories. No body morphing. No extra fingers. No malformed hands. No duplicated limbs. No floating objects. No disappearing decorations. No duplicated decorations. No magical object appearance. No floating flowers. No broken garlands. No disconnected fairy lights. No plastic-looking Ganesha idol. No CGI idol. No artificial diya flames. No background morphing. No wall deformation. No lighting flicker. No unnatural time-lapse artifacts. No excessive motion blur on face. No robotic movement. No unnatural smile. No exaggerated Namaste. No camera shake. No random camera angles. No text. No subtitles. No watermark. --- -FINAL OUTPUT REQUIREMENTS **VIDEO 1 — [0:00–0:10]** Starting setup → circular arch → banana leaves → flowers → jasmine garlands → brass bells → fairy lights → floral altar preparation. **VIDEO 2 — [0:10–0:20]** Continue altar → place clay Ganesha idol → final flowers → light brass diyas → reveal completed backdrop → warm smile → Namaste. **TOTAL DURATION: 20 SECONDS** **ASPECT RATIO: STRICTLY 9:16 VERTICAL** **FRAME RATE: 30 FPS** **STYLE: ULTRA-PHOTOREALISTIC FAST-MOTION DIY TIME-LAPSE** --- MOST IMPORTANT **@Image1 = EXACT PERSON REFERENCE.** **The person's face, appearance, hairstyle and outfit must remain consistent with @Image1.** **FACE MUST BE CLEAR, NATURAL AND REALISTIC WHENEVER VISIBLE.** **VIDEO 1 → VIDEO 2 must look like ONE continuous 20-second recording of the same person creating the same Ganesh Chaturthi backdrop.**
Conclusion
Making an AI video with Google flow using your photo can be a simple and creative workflow for social media creators. You can start with a single image, set your video requirements, upload the image and enter a detailed AI video prompt.
For Instagram Reels, it's a good idea to split your idea into three short video clips so that you can make a strong hook, process, and CTA. With clear prompts, natural dialogue, and consistent visual instructions you can experiment with different AI video concepts and turn simple photos into engaging short-form content.
dinxsh7
EditorEditorial contributor researching practical guides, tech discoveries, and curated recommendations for Dinesh Picks.
Continue Reading